Before I bore you with my goals/UFOs, I'll show you what I worked on over the weekend.
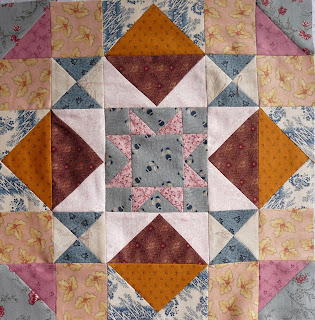
I finished the six baskets that I prepped 3 different ways. The ones I prepped in #1, which was using the magic sizing to stick the seam allowance onto the back, worked the best and was the easiest applique to accomplish. I prepped 3 more like that to do this week. All the baskets came out ok, but I wasn't satisfied with methods #2 & #3.

Here's a picture of all the baskets I've finished so far (on my design door).

I also decided to do the QAL that Lori posted on her blog. It's a small one this year. I can't believe all the problems I had while putting it together. First, the needle broke and when I put in the new needle, I couldn't get my automatic needle threader to work. Then I lost one of the large triangles for the flying geese on the middle star and had to cut another one (found 1st one under a cabinet). While cutting some fabric for the second round, I cut off the corner of the sawtooth star and had to replace the corner square. When I made the brown/pink flying geese, I cut the brown square the wrong size, made the 4 FG and thought - they sure look different than normal - had to do those over again. Then I misplaced one of the cheddar pieces and had to hunt for it - it was folded in a piece of pink fabric! don't know what my problem was, but I finally got the top finished!! Yea!
I cut a bunch of 1" strips to use in my log cabin blocks from the scrap bag I got. There's still a lot of fabric left from the bag.

So far I have 196 block finished. I'm not sure how big I will make it, but I figured if I had 225 blocks, it would measure about 71" square. I'm going to want it to fit on a bed.

I have quite a few UFO's which I will list and will put an asterisk next to the ones that are a priority. I have 3 categories of projects: hand work, which includes embroidery, appliqué, quilting and sewing bindings; quilts; and Miscellaneous projects, such as finishing an embroidery project into a pillow or wall hanging.
Handwork
1. Over the River and Through the Woods wall hanging - 2 panels of embroidery are finished, one more to do, then it goes into the quilt category.
2.* Baskets for You BOM - applique 12 baskets per month for 10-12 (?) months and then a large floral design in the middle. I don't want to get behind on the baskets, so will try to do them as soon as I get them from the quilt shop.
3. Finish flower basket appliqué project that I won from Lori, then decide if I want to make more & how to use in quilt. Almost finished with one.
4. Enlarge my GMF lap quilt by about 4 rows all the way around.
Quilts
1. *Civil War Quilt - the blocks are ready to put together. It's ready to baste.
2. **Quilt for DIL - machine appliqué - Need to finish by March birthday.
3.**2 secret quilts - Need to finish by September - I'm almost to the point of putting the blocks together. *As of 5/7/13, the blocks are put together and I'm starting to put the borders together. As of 9/9/13, one quilt is finished and the other is ready to baste and quilt.
4.Red Hexie mini quilt - almost finished and ready to be layered - idea from JoAnn - Thread Head.
5.A Tisket A Tasket applique basket quilt - 8 baskets are done, need to do 4 more and then make into a quilt.
6. Veranda Views - all embroidery is finished - need to make into blocks and put together.
7. Oak Leaves & Turkey Feathers wall hanging - started, but not much done - machine applique and piecing.
8.Scrappity Do Dah - blocks finished - need to put together into queen size quilt.
9. Grandmother's flower garden lap quilt - need to decide if I want to make it bigger and then finish.
* I decided to make it bigger, so I'm working on more hexies by hand.
10.Log Cabin Quilt - I've been working on this mainly on trips and have 196 blocks made finishing at 4 3/4". No hurry on this one.
11.Seasons in a Row - my oldest UFO that was a guild project. I have about 8 rows finished and there's one for each month. *As of 5/7/13, the top is finished.
12. Basket wall hanging - need to fix it a little, then it's ready to layer and quilt.
13.Ohio Star boys donation quilt - have about 12 blocks made.
14. 4-patch donation quilt - have lots of blocks made - it's a leader/ender project.
Miscellaneous
1. Finish embroidery on Denim shirt.
2.Finish round wool pincushion.
3.Finish bird pincushion.
4. Put together Liberty Bell embroidery project -stitching is finished. I decided I didn't like the fabric that the Liberty Bell was embroidered on, so I need to make a new one.
5. Put together sampler cross-stitch project - stitching is finished.
If I can resist starting any more projects, I should be able to complete some of my UFOs. I plan to dedicate myself to getting projects finished. I also want to organize my sewing closet and scraps so I can use them more efficiently. I'm not sure when I'll get to those tasks.
Wish me luck!
I finished the six baskets that I prepped 3 different ways. The ones I prepped in #1, which was using the magic sizing to stick the seam allowance onto the back, worked the best and was the easiest applique to accomplish. I prepped 3 more like that to do this week. All the baskets came out ok, but I wasn't satisfied with methods #2 & #3.

Here's a picture of all the baskets I've finished so far (on my design door).

I also decided to do the QAL that Lori posted on her blog. It's a small one this year. I can't believe all the problems I had while putting it together. First, the needle broke and when I put in the new needle, I couldn't get my automatic needle threader to work. Then I lost one of the large triangles for the flying geese on the middle star and had to cut another one (found 1st one under a cabinet). While cutting some fabric for the second round, I cut off the corner of the sawtooth star and had to replace the corner square. When I made the brown/pink flying geese, I cut the brown square the wrong size, made the 4 FG and thought - they sure look different than normal - had to do those over again. Then I misplaced one of the cheddar pieces and had to hunt for it - it was folded in a piece of pink fabric! don't know what my problem was, but I finally got the top finished!! Yea!


So far I have 196 block finished. I'm not sure how big I will make it, but I figured if I had 225 blocks, it would measure about 71" square. I'm going to want it to fit on a bed.

Handwork
1. Over the River and Through the Woods wall hanging - 2 panels of embroidery are finished, one more to do, then it goes into the quilt category.
2.
3. Finish flower basket appliqué project that I won from Lori, then decide if I want to make more & how to use in quilt. Almost finished with one.
4. Enlarge my GMF lap quilt by about 4 rows all the way around.
Quilts
1.
2.
3.
4.
5.
6. Veranda Views - all embroidery is finished - need to make into blocks and put together.
7. Oak Leaves & Turkey Feathers wall hanging - started, but not much done - machine applique and piecing.
8.
9. Grandmother's flower garden lap quilt - need to decide if I want to make it bigger and then finish.
* I decided to make it bigger, so I'm working on more hexies by hand.
10.
11.
12. Basket wall hanging - need to fix it a little, then it's ready to layer and quilt.
13.
14. 4-patch donation quilt - have lots of blocks made - it's a leader/ender project.
Miscellaneous
1. Finish embroidery on Denim shirt.
2.
3.
4. Put together Liberty Bell embroidery project -
5. Put together sampler cross-stitch project - stitching is finished.
If I can resist starting any more projects, I should be able to complete some of my UFOs. I plan to dedicate myself to getting projects finished. I also want to organize my sewing closet and scraps so I can use them more efficiently. I'm not sure when I'll get to those tasks.
Wish me luck!